Pages

Wednesday, August 27, 2014

DIY Self Tanner! :)

Hey everyone! I know I haven't posted anything in a few days, and I am super sorry for that. I decided today that I am going to do a a DIY lesson so that we can all add something new to our beauty products collection, for super cheap! :)
Today we will be talking about Self/Gradual Tanner! I know that summer is coming to an end, and natural tans will begin to fade. Self tanner is the best way to keep your summer glow all year around without having the damaging effects of tanning beds! I will show you a few different methods to make your self tanner, and then you can choose which one you like best! :)

Method 1: Cocoa Powder/Instant Coffee

With this method, you will need:

A mixing bowl
A spoon
Cocoa powder or instant coffee
Scented or unscented lotion WHITE lotion

How to make it:

First you will need to pour your lotion into the bowl. Try to start off with about 1/8 of a cup. Now add a teaspoon of cocoa powder or instant coffee to the bowl, and mix with your spoon. Depending on how the color turns out, you may want to add more lotion, or add more powder. Add and mix until desired shade is achieved.

How to apply:

I would recommend using gloves when doing this method because it can stain your hands really easily. It may also help to use a memory foam sponge, like what is used in the high-end self tanner gloves. This will leave a streak-free, natural brown color to your skin. Be sure to apply daily!

Method 2: Brewed Tea/Coffee

With this method, you will need:

A spray bottle
Brewed tea or coffee

How to make it:

Simply brew about 2 teabags per cup or water, or 3 tablespoons of coffee per cup of water. Let it sit out until it is room temperature, and then pour it into the spray bottle.

How to apply:

I would recommend grabbing a basic sponge for this method. Just spray onto the skin, and blend in with a regular sponge. Allow the first coat to dry. Repeat if necessary to achieve the desired shade. Be sure to apply daily!

Method 3: Coconut Oil and Tea

With this method, you will need:

Coconut oil
White scented or unscented lotion
Tea bags
Mixing bowl

How to make it:

Heat the coconut oil in mixing bowl until liquid, and hot to the touch. Steep about 4 teabags per tablespoon of coconut oil. Once the coconut oil is nice and dark, remove the teabags, and drain excess coconut oil back into the bowl. Throw away the teabags, and allow the coconut oil to cool until almost completely solid. Pour about 4 tablespoons of lotion into the bowl with the coconut oil, and mix well. If color is too dark, add more lotion. If the color is too light, add more coconut oil.

The amount of teabags used per tablespoon of coconut oil may vary to achieve different results. You may also substitute the tea for instant coffee, or even cocoa powder :)

How to apply:

I would recommend using gloves when doing this method because it can stain your hands really easily. It may also help to use a memory foam sponge, like what is used in the high-end self tanner gloves. This will leave a streak-free, natural brown color to your skin. Also, the coconut oil will help the pigment seep deeper into your skin, as well as moisturize your skin, resulting in better staying power. Be sure to apply daily!
Well, that's all for today! I hope you enjoyed learning how to make your own self-tanners. Go try one or all of these methods out, and comment below to let me know how it worked for you! 

Thanks for reading! :) I love you all <3

Tuesday, August 19, 2014

First Impressions, Demo, & Review: Lamora Flat Top Kabuki Brush

So, I posted the video to YouTube last night, and totally forgot to post it here! I'm so sorry everyone! Here it is, I hope it is helpful to you :) Love you! <3


Don't forget to follow me on my social media! :)

Sunday, August 17, 2014

Coming Soon: First Impression and Review Vlog! (Flat Kabuki)

I'm so excited! I got my new Flat Kabuki brush today in the mail! :D I have never used a flat kabuki brush before, so I plan on doing a First Impressions Vlog on my YouTube channel sometime tomorrow evening.

I actually got five of these brushes today, and I obviously don't need ALL of them, so I will be including one of these in my next giveaway! :) Keep an eye out for more details on that. And check back tomorrow for my first impression vlog! :)

Thanks for checking in! I love y'all! <3

Saturday, August 16, 2014

Makeup Talk: Lip Primer

Let's have a discussion today! :) I was just scrolling through my newsfeed on Facebook, and I saw this post about "Lip Primer: is it worth it to buy it?" So, I commented on it. And then I decided to start a discussion on here with my viewers. 


The topic will be about lip primers (obviously), and I am asking all of you to answer these three questions:

  1. "Do you use lip primer?"
  2. "Why do you (or why don't you) use it?"
  3. "Is it worth it to buy it? (Would you recommend it?)"
My answers are:
  1. Yes I do! :)
  2. I honestly love lip primer. I have two different brands of lip primers: Femme Couture, and e.l.f. Cosmetics. Frankly, the Femme Couture ($8) does not work nearly as well as my e.l.f. Cosmetics ($3) primer. Plus, the e.l.f. Lip Primer is a nude-ish color, so when you put your lipstick over it, the color is definitely TRUE color.
    Even if I eat or drink or anything, the color stays. Don't get me wrong, some of the lipstick or gloss will come off, but it keeps the color intact. It really helps if you blot your lipstick after applying primer and color. That's the best way to keep it on all day. 
  3. I would say, yes. It's worth it. For me, it keeps my lip color on all day.
I want to hear from you! Comment with your answers, and feel free to discuss it with each other, too!
Thanks for stopping by! Keep checking in for more posts like these :) I love you all! Peace, love, and namaste! <3

Friday, August 15, 2014

Instagram Giveaway Winner! 8.15.14

Unfortunately, I only had 6 entries in my giveaway from this week :( But I still picked a winner anyways. I used a random number generator online, so that it would be totally fair. I got the number 352, so I chose the person who picked the number closest to this.

Our winner was @xo.yasminn with a winning number of 450! Congratulations! :) I will mail your makeup on Monday! Thank you for participating, and keep an eye out for my next giveaway! :)


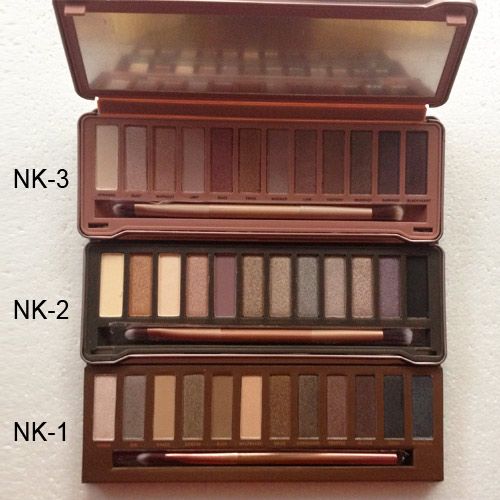
Super Cheap PERFECT Urban Decay Naked Dupes!!

Check out these super cheap Naked Palette dupes! They look identical to the authentic palette, with little difference in color! 

These palettes sell for $54 each, on Urban Decay's website (www.urbandecay.com/naked/naked-color), but you can find them right here for around $7 each! They are the perfect duplicate for the original Naked Palettes! 

I am so excited to order these and review them for you sometime soon. The part that makes me the happiest about these is that I can watch makeup tutorials online, and I don't have to guess which color on my dupe palette that I should use in replacement of the Naked color that the vlogger is using! All I have to do is find the same color on the same place in my palette as they used in theirs! 

Go check out this amazing deal! :)

$21.74 and Free Shipping <<<-----Click here for the deal!

Makeup Tip!! 8.15.14

So, I'm not sure if this is already posted on the internet or not (not sure if anyone has discovered or announced this yet), but I just found out that there is a miniature sharpener for your lipstick on the bottom of the e.l.f. Matte Lipstick and the Lorac Pro Matte Lip Color! (At least I THINK it's in the Lorac Matte Lip Colors. Please try it and let me know!) Don't ask me how I figured it out. I was bored and I like to take things apart when I'm bored, apparently :) Go check it out, though! This is awesome information :)